|
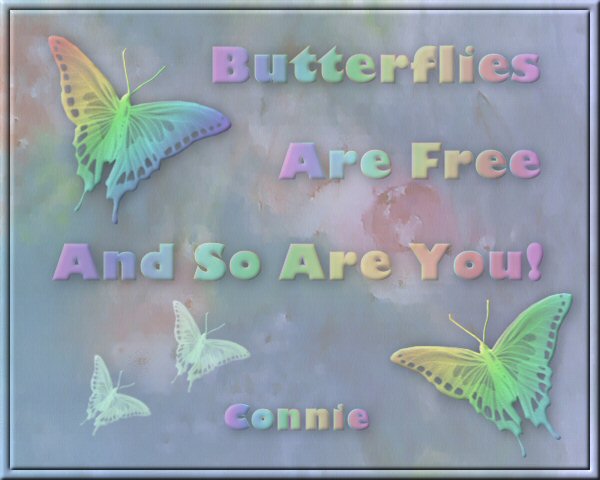
Open the CLD watercolor background
image contained in the zip file, duplicate and close the original image.
I also like to duplicate the original
layer of the Background just in case.
Save your image as a psp file with
whatever name you choose and remember to save it periodically as you work.
Create a new raster layer.
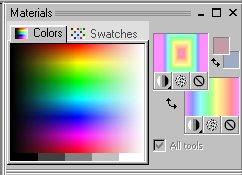
Set your color palette up as below.
I used Rainbow Pastel Gradient, but you can choose your favorite one.
Select your Paint Brush from the Tools
and select the CLD Butterfly brush with these settings.

Place your butterfly near the bottom
of your image and with the two choices in your gradient,
Right clicking will give you one
coloring and left clicking will give you a different coloring.
Change the size of your Paint Brush to
180, and create a new raster layer.
Place this butterfly near the left top
of your image.
Image>>>Rotate
Image>>>Free Rotation set at 45 degrees, all layers unchecked.
Create another raster layer and set
your brush size to 90 and put another smaller butterfly in the lower left.
Image>>>Rotate
Image>>>Free Rotation set at 55 degrees, all layers unchecked.
Set the layer blend at Screen.
Depending on your gradient, you may want to experiment with the layer
blends
for all your butterflies, trying
Color, Luminous, Saturation, etc. to see which you like best.
Select Text Tool and your favorite
wide font, I used Gill Sans Ultra Bold.
Your Font size will depend on your
choice of fonts.
Type in Butterflies, apply and
position it toward the top.
Sometimes I will pull the shape out
longer by using the Vector boxes.
When you have your script how you like
it, change the layer to raster.
Type in Are Free, as directions above,
apply and then And So Are You, with same
directions.
You will need to position your text
and butterflies so they are balanced.
Change your font size to a bit smaller
and add your signature near the bottom.
Use these settings for a bevel for
your butterflies and your text.
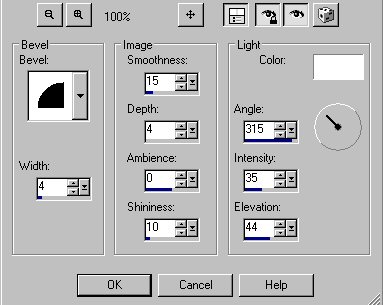
Add a drop shadow of +2 Horizontal and
Vertical to your butterflies and text.
I turned the layer opacity down on all
of my layers so that my colors were softer, but again,
play with the layer blends until you
like it.
I also duplicated the white butterfly,
reduced its size by 10% and rotated it 11 degrees.
Save as PSP file.
Copy merged and paste as new image.
Selections>>>Select All.
Selections>>>Modify>>>Contract
by 10 pixels.
Apply Inner Bevel with same settings
as before.
Selections>>>Invert selection
and apply Inner Bevel. Deselect and save as jpg.
That's all folks!! Enjoy!
|